In this article, we’ll explore budget-friendly build ideas, showcasing how you can create a standout functional rifle for under $300. The brand making this build challenge possible is one that’s impressed me time and time again with how much value they can output for the price: Double Bell. Double Bell offers full metal airsoft guns with reinforced internals (steel tooth pistons, CNC aluminum compression parts) for under $200, which is quite the deal given the current state of the airsoft market. These rifles are also perfectly compatible with Tokyo Marui parts, making further customization of internals/externals a breeze.
To demonstrate the potential of Double Bell's affordable rifles, Evike Superstore and I have crafted some nifty custom builds, each staying within the $300 limit. I find that taking a look at what attachments other players are using gives me direction when trying to create something myself, so I hope that these builds can inspire you in the same way! Let’s get right into it!
PDW with OD Green Accents by Tyler J.
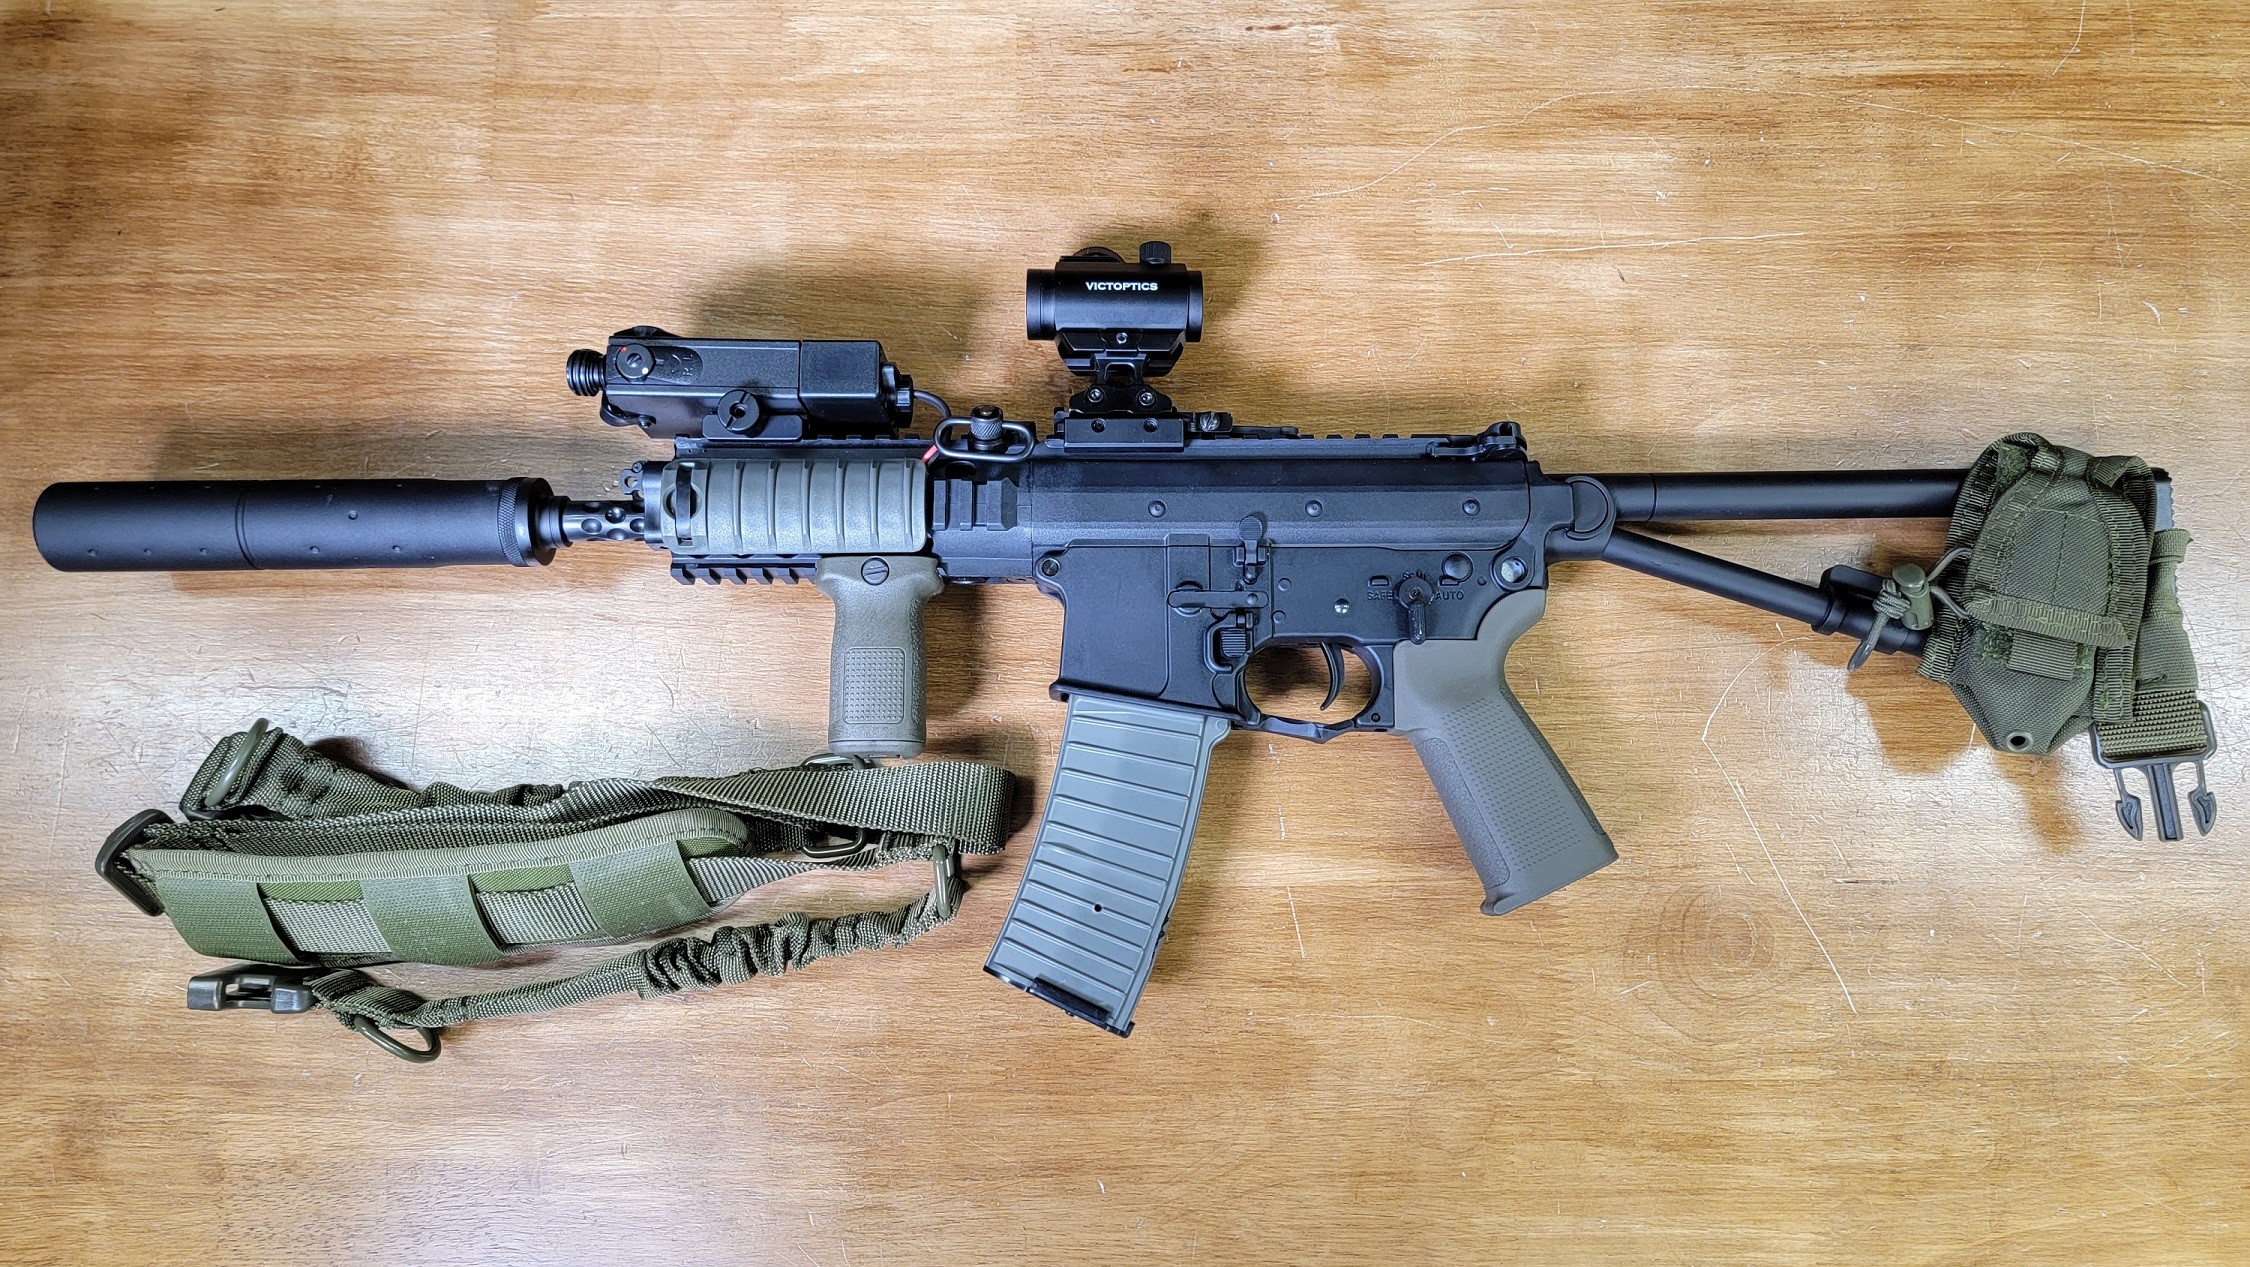
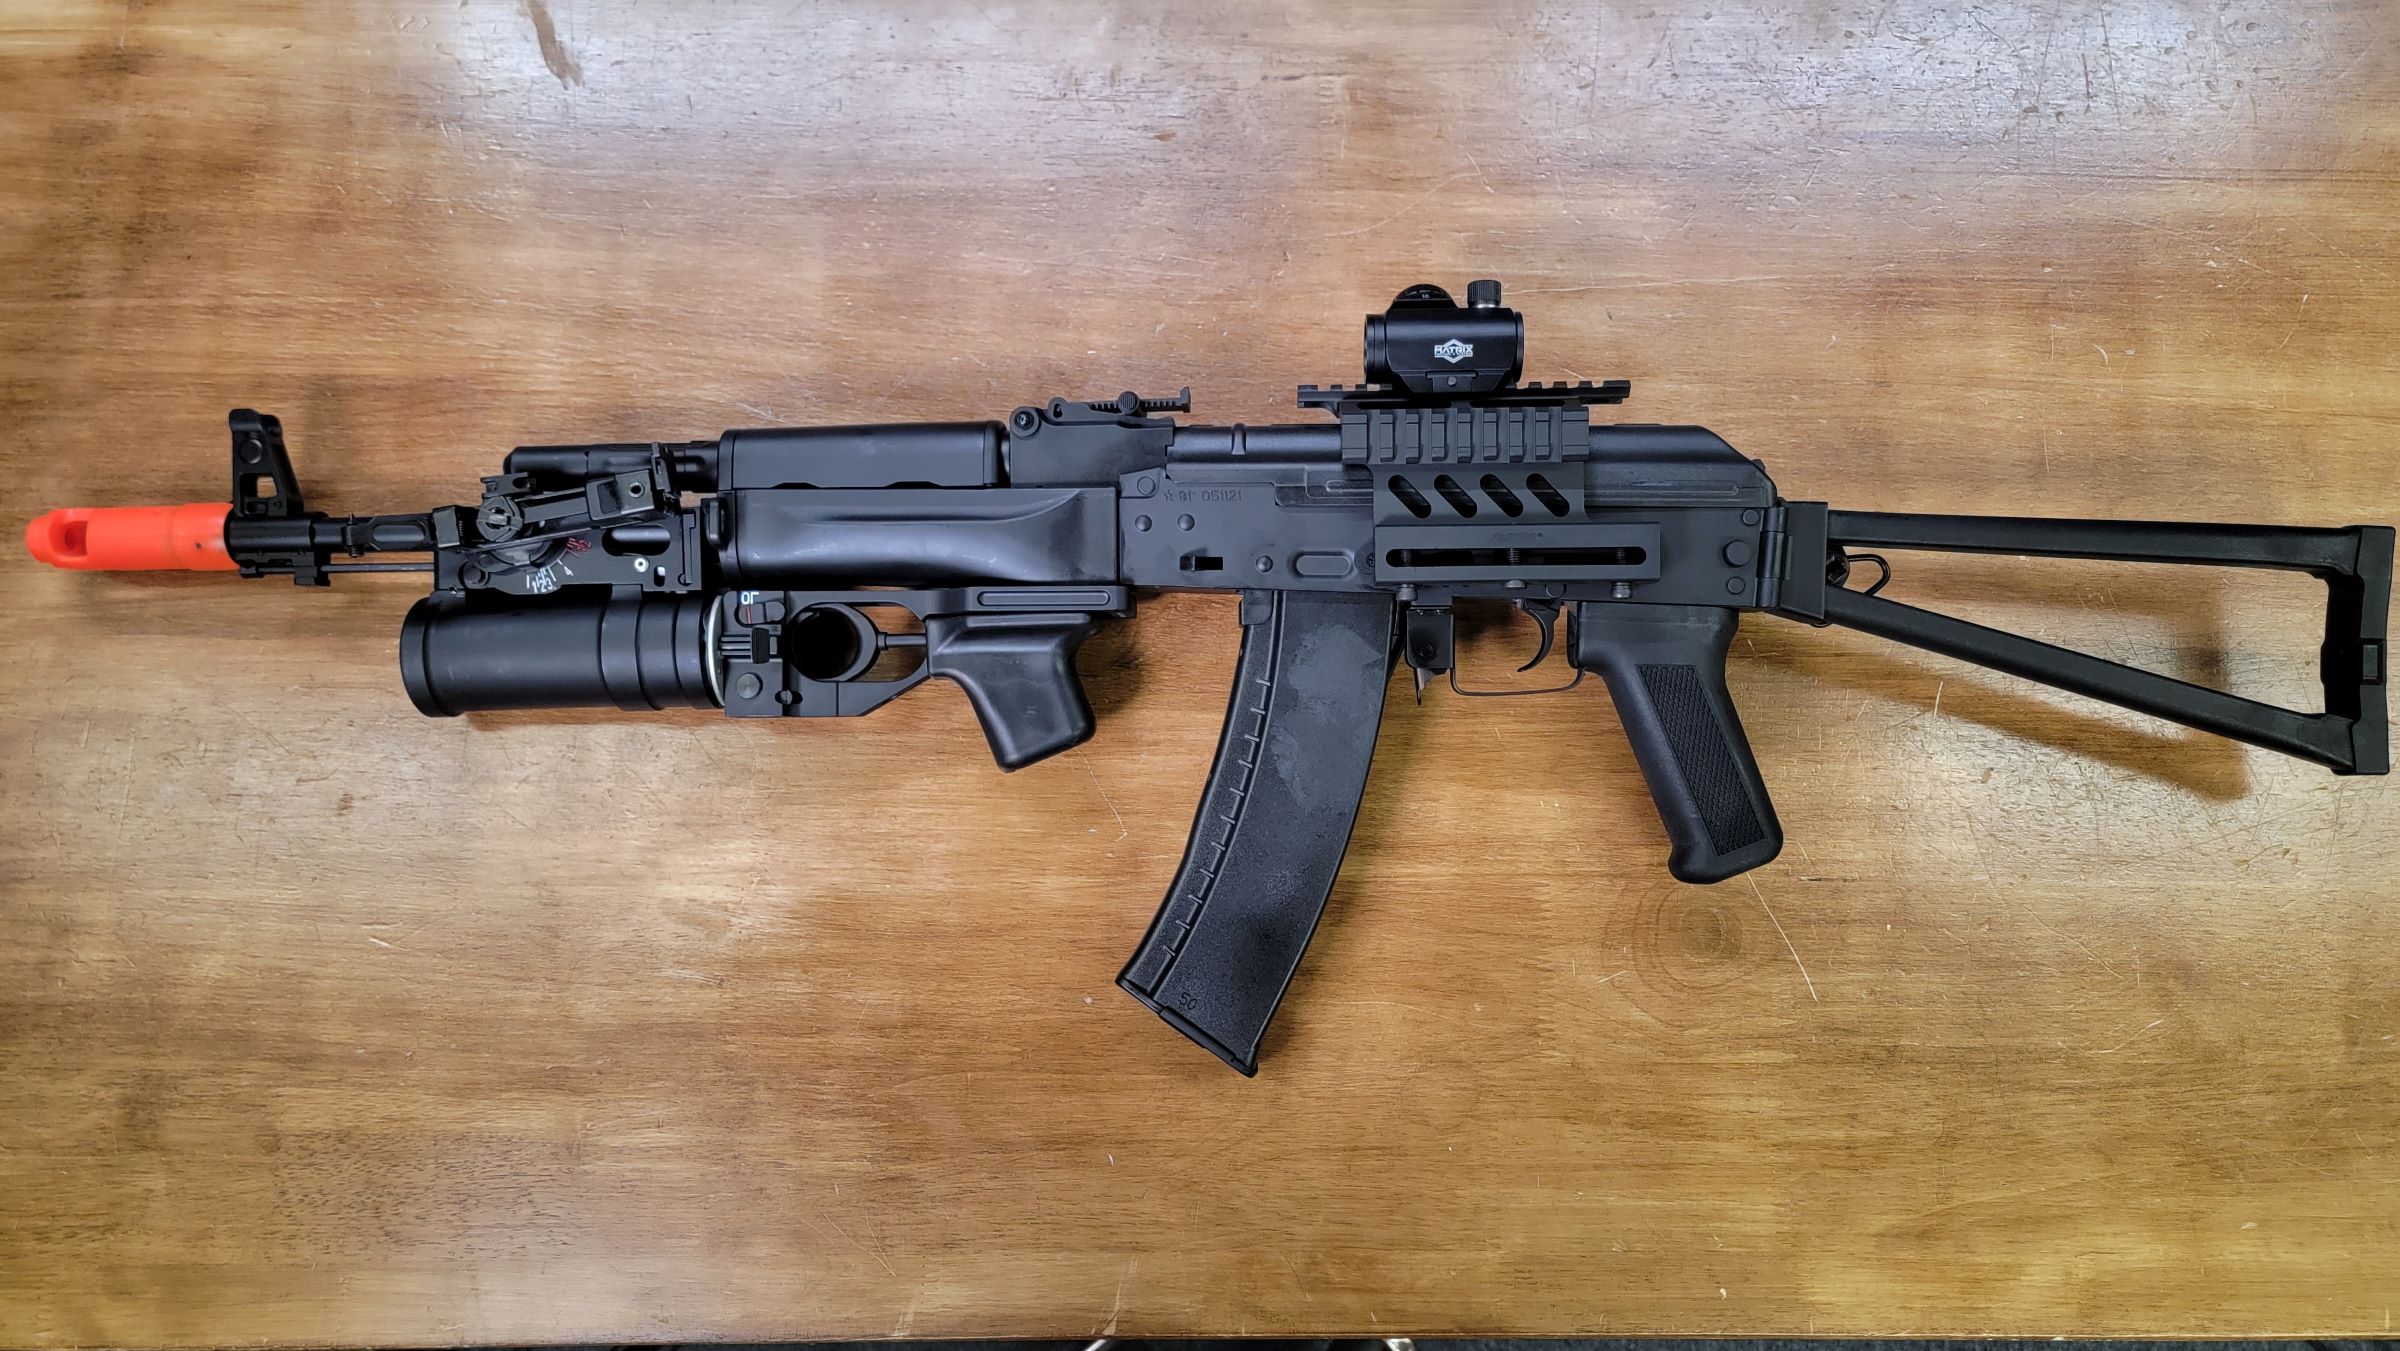
We’ll start off with my personal contribution to the list: A Double Bell PDW with OD Green Accents. This PDW was my inspiration for this article in the first place, as I was blown away by the ludicrously low price this rifle comes in at. Despite its somewhat cheap polymer build construction, this rifle has all the same internal bells and whistles a standard full metal Double Bell AEG would. Here’s my subtotal for the build:
Double Bell PDW Airsoft AEG Rifle w/ Folding Stock (Color: Black) $89.00
CYMA 190mm Aluminum Mock Suppressor $22.00
Matrix Victoptics 1x22 Compact Red Dot Sight with skeletonized picatinny riser $49.00
PTS EPF2 Vertical Foregrip (Color: OD Green / Short) $18.95
UTG Low-Pro Picatinny-mount Angled QD Sling Swivel Adaptor $12.97
UTG Push Button QD Sling Swivel (Model: Standard w/ 1.25" Loop) $7.97
2x Matrix Special Force Rail Covers - 5 Ribs (Color: OD Green) $8.00
Condor MOLLE Multi-Purpose Handheld FRS Radio MOLLE Pouch (Color: OD Green) $10.95
Tacbull FrontEdge Two-One Point Rifle Sling w/ Hooks (Color: OD Green) $15.00
Grand Total: $233.84
Since the rifle less than a third of the total budget for this challenge, I had plenty of room to kit this gun out with whatever I wanted. Even with everything I set up for it, I still had well over $60 left unused!
Holding the un-upgraded PDW, the first thing that particularly irked me was the tiny pistol grip. I recently found out that PTS now makes their EPG series grips in OD Green, which is super cool considering I’ve been using their standard black ones on most of my builds for years. The standard magazine the Double Bell PDW comes with is a grayish green anyway, so I thought the color might mix well. Much to my pleasure, the grip fit on without hassle. I discovered that the standard motor housed in the grip has a medium length shaft, so I threw in a basic long shaft M4 motor I found in a boneyard bin to ensure it cycles properly. Paired with the corresponding PTS Stubby Foregrip, rifle manipulation is comfortable and suited to my liking. I also threw on some green rail covers to complete the color flair and smoothen the resting spot for my thumb.
I must admit! There is an error on our website about this PDW! The Double Bell PDW does not come with a threaded barrel. I removed the orange tip to find smooth plastic underneath. But, as you can see in the picture, I found a way to mount a suppressor regardless. Using a heat gun, I softened the smooth plastic at the end of the barrel and began to slowly twist on the CYMA suppressor anyway. The suppressor’s threads carved out new threads on the soft plastic. By some miracle, it adhered straight enough for the BB to not baffle strike the suppressor. Success!
Choosing an optic was relatively simple. I’ve been impressed with other optics under the Victoptics name, so I had been wanting to test this one out for a while. I moved the included PDW riser forward to mount the optic at the position of my liking, then placed the Victoptics red dot right on top. I think the sleek riser looks really cool!
At this point, I felt finished with the build… until I found that I had over $100 left to still use for attachments. This left me with enough room to get a little extra! To truly complete this rifle, I gathered the attachments necessary to give it a proper sling. I used UTG’s inexpensive sling adapter combo up at the front, and mounted the rear portion of the sling at the back of the PDW’s stock. Just because I could, I also threw a green radio pouch onto the stock that can snugly fit a spare PEQ style battery just in case. I chose the Tacbull sling since it was new (and one of the only green slings we had on hand at the time) to finish it off. Voila! The Double Bell PDW was complete!
This platform is incredibly versatile. It’s short enough for CQB while also having a reasonable enough barrel length for outdoors as well. Pair that with the quick change spring system and you have a rifle that can genuinely do well at just about any airsoft field. I love how this build turned out! If you use this as inspiration for your own airsoft build, post it and tag us on instagram @airsoftevike!
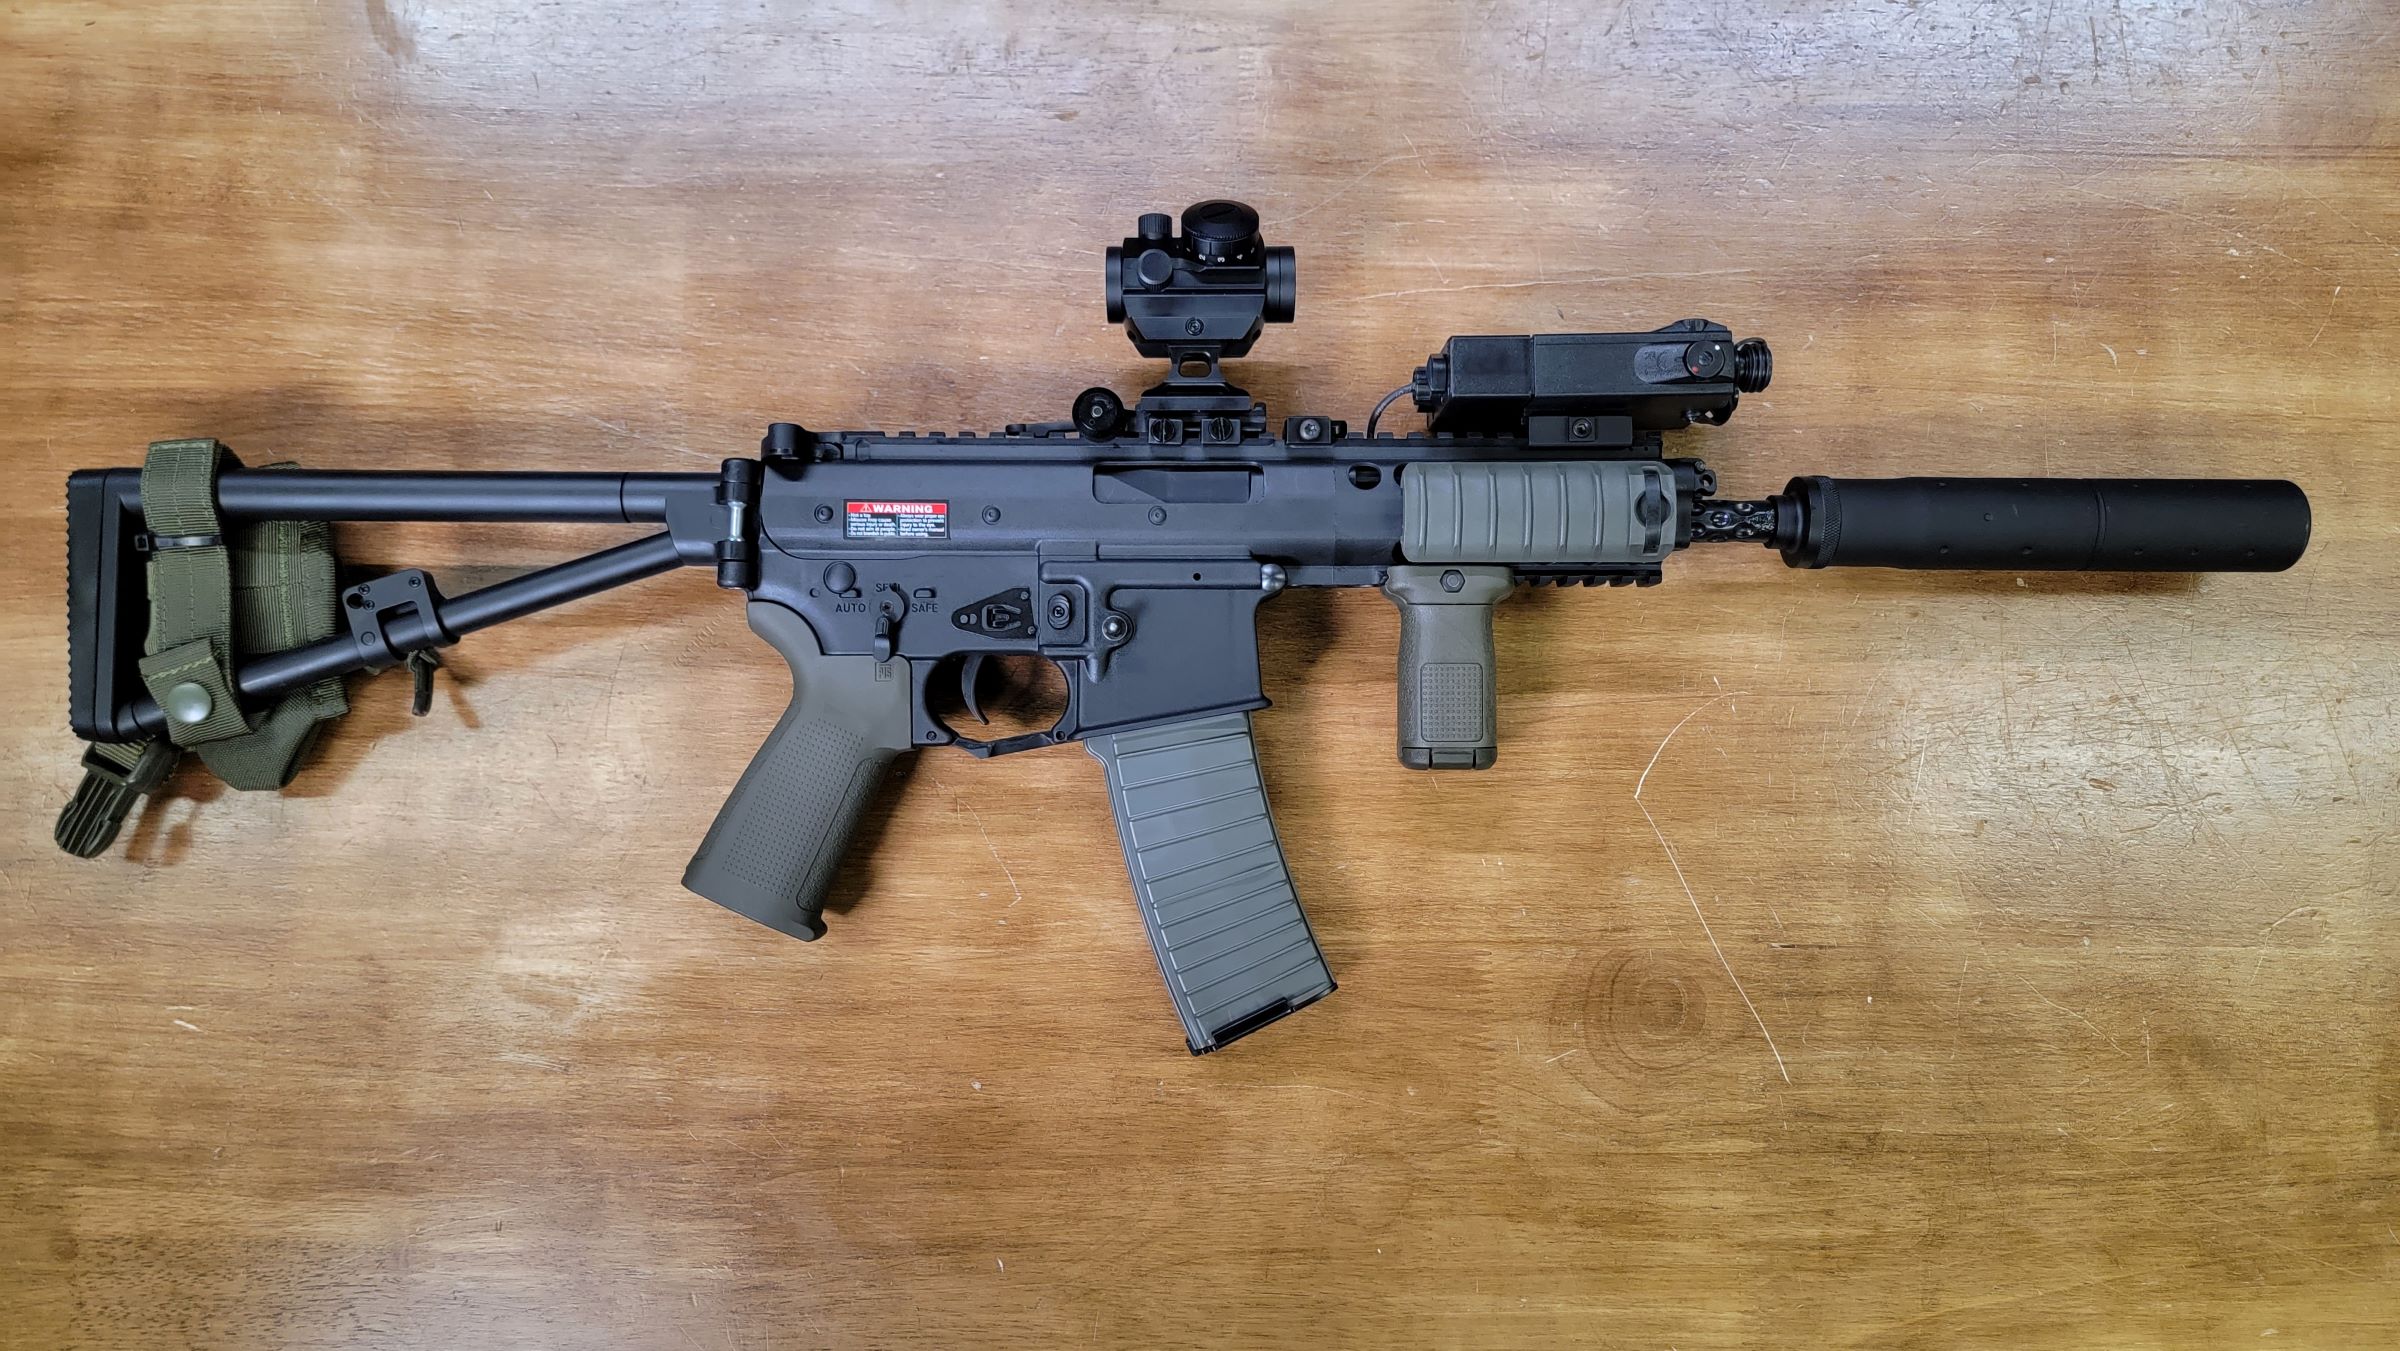
Modernized Bronze M4 by Jesse H.
Next up we have a build by Evike Superstore employee Jesse H., who recommends double bell to new players regularly. He likes to keep his ARs simple: sleek M-LOK rail, T1 style red dot, high quality receiver construction. You’ll never find him running a polymer bodied gun. For this build competition, he picked one of his favorite M4 models by Double Bell. The bronze finish is well done and adds to this gun's modernized aesthetic, suiting Jesse’s simple tastes while still standing out. Here’s the handful of items he used to create it:
Double Bell Precision M4 Airsoft AEG Rifle w/ 12" Skeletonized Handguard (Color: Tan) $219.00
Avengers X1 Compact Reflex Red & Green Dot Sight w/ QD Riser (Color: Tan) $52.00
2x Strike Industries M-LOK Rail Covers V1 (Color: Flat Dark Earth) $7.95
Grand Total: $286.90
The Avengers T1 red dot was an easy first pick for Jesse. For the price, its lens and dot quality are quite high. It’s a tried-and-true airsoft dot that works well on a wide variety of airsoft guns. Much like my PDW, the dot is positioned as close to the front of the upper receiver as possible to provide more peripheral visibility. To build upon the growing palette of tan colors and to provide leverage for operation, Jesse used the Strike Industries rail covers. Their textured rubber makes handling the rail a tad more secure. Plus, they just look cool! A custom build doesn’t need much to be personalized and stand out. Jesse’s awesome build excels at this virtue!
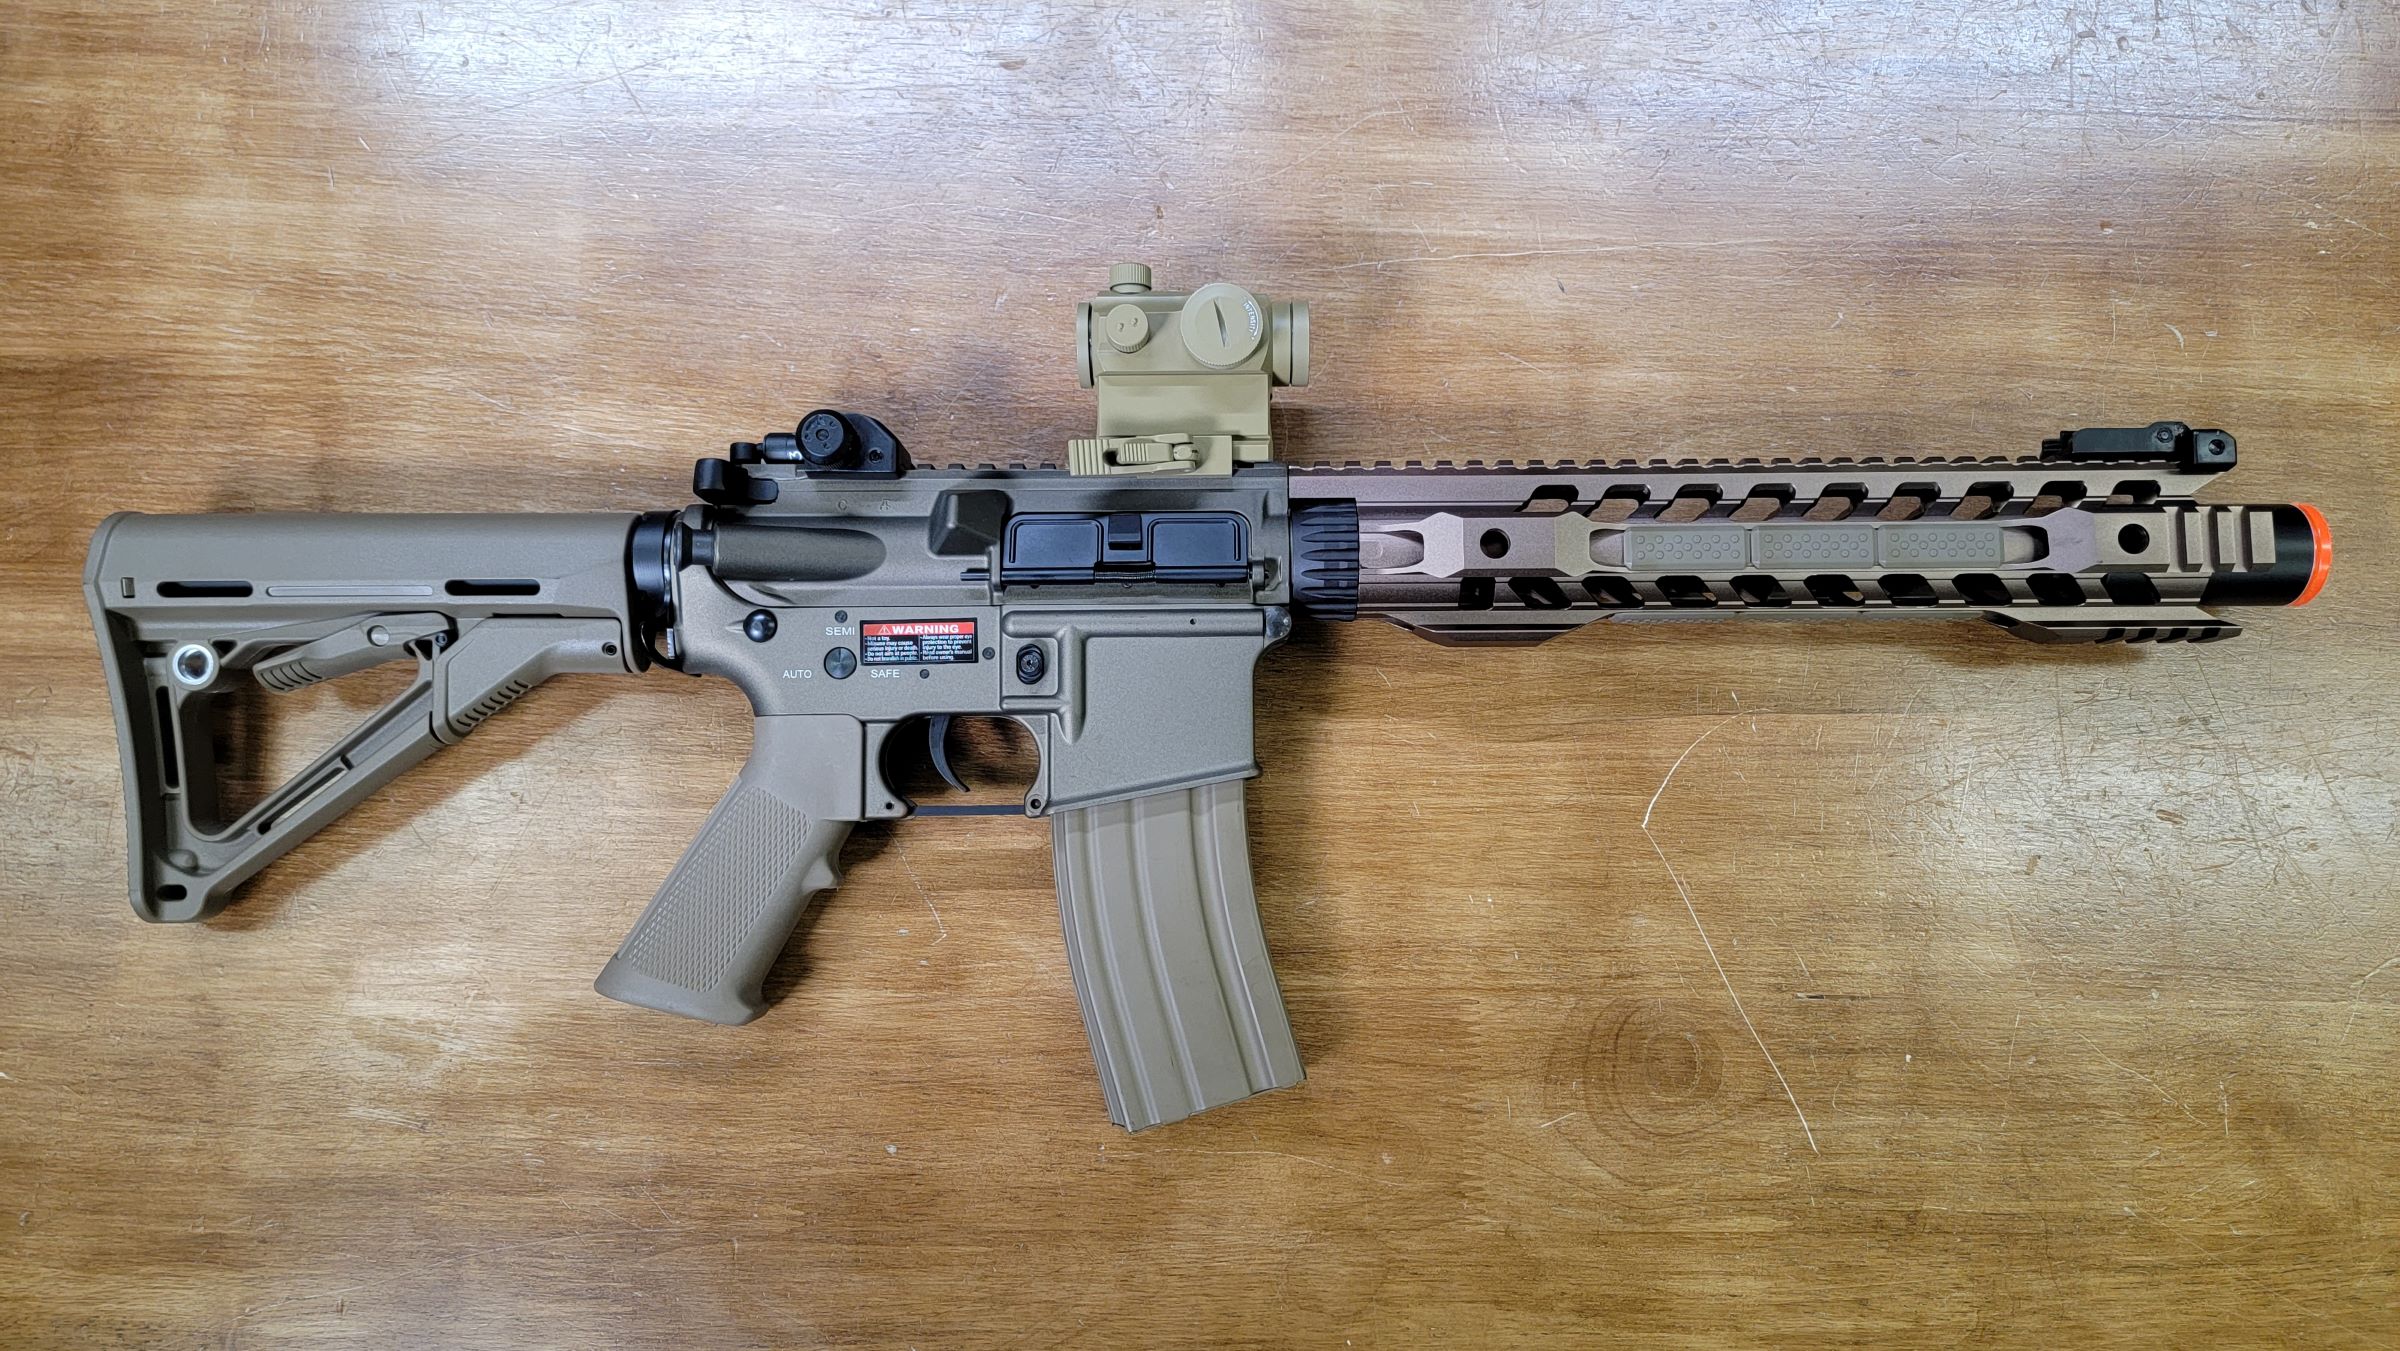
Grenadier AK74 by Lawrence H.
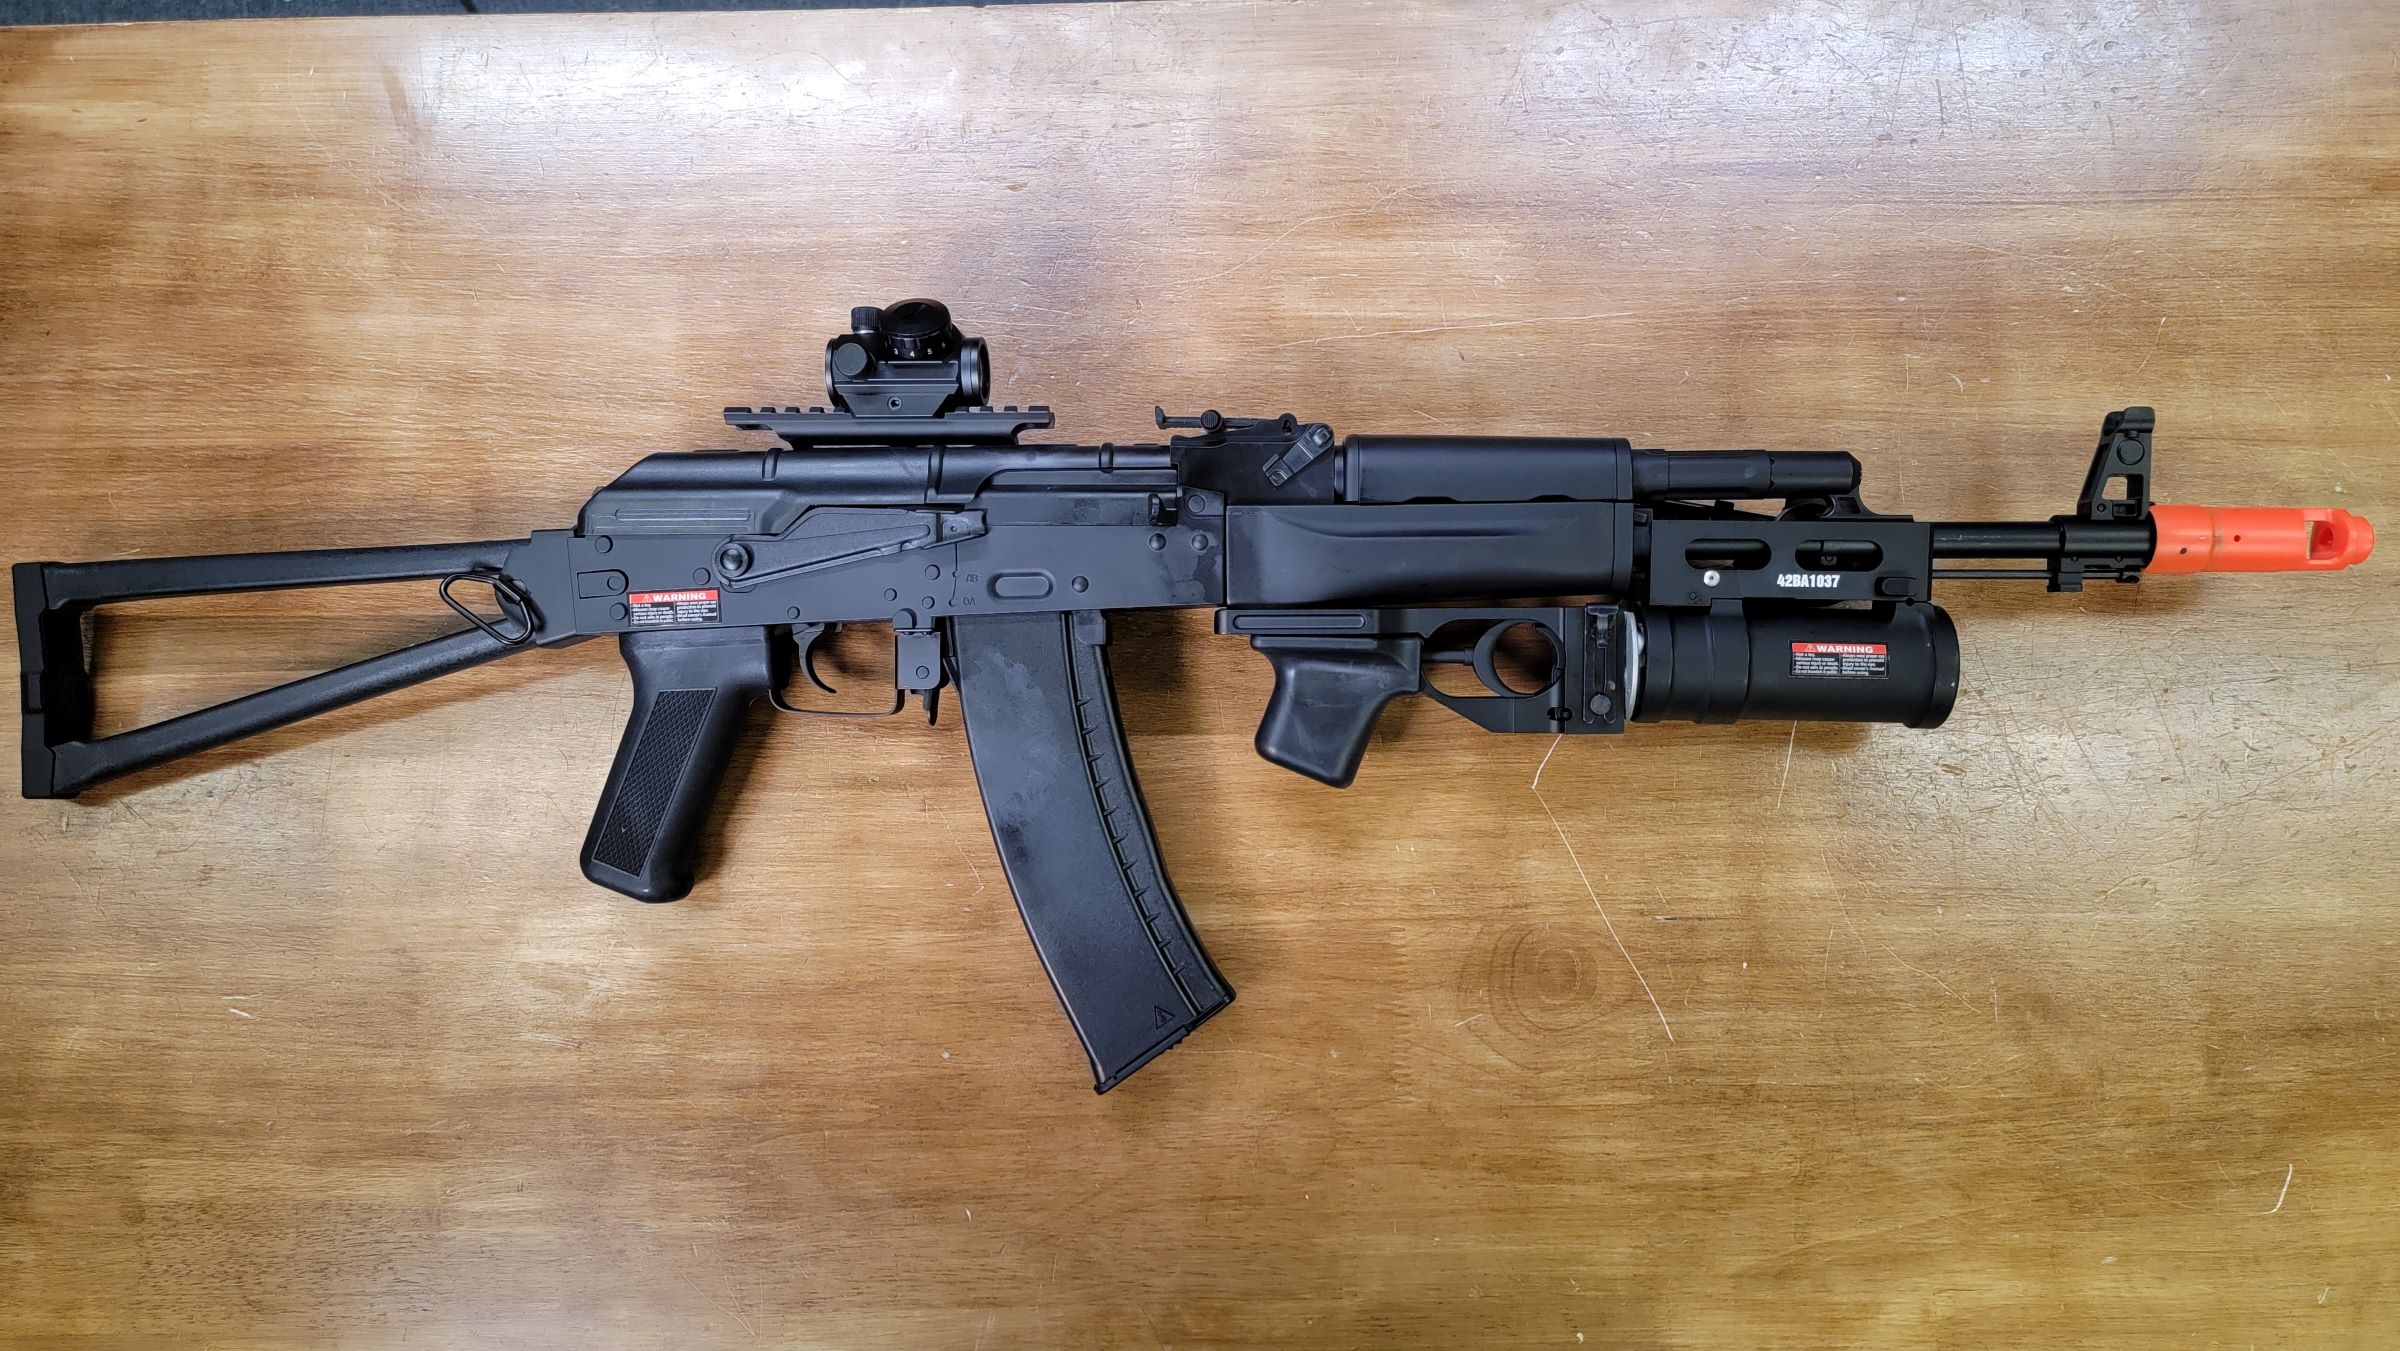
Custom AKs are typically a more challenging task than a custom M4. The rough and tumble Russian platform isn’t designed with modularity in mind, especially if starting from a base with no rail space to begin with. Yes, there are aftermarket rails for AKs out there, but they are usually difficult to fit and brand-to-brand differences in tolerances often hamper ease of customization. Lawrence from Evike Superstore took this challenge head on, creating something awesome within the guidelines of this build challenge. Feel free to take a look at the items he used:
Double Bell Sportsline AKS-74N Airsoft AEG Rifle (Model: Type B) $92.00
Double Bell GP-25 40mm Grenade Launcher for AK Series Airsoft Rifles w/ Grenade Shell (Model: Launcher Only) $139.00
NcStar AK QD Side Rail Optics / Scope Mount with Double Rail $26.99
Matrix Tactical X1 Compact Reflex Red Dot Sight $36.00
Grand Total: $293.99
Love how the grenade launcher is more expensive than the rifle itself! Lawrence’s build was an ambitious one, and I’m surprised it turned out as cool as it did with the restrictions put in place. The grenade launcher setup does include a shell, making the build functionally ready to go for a blasting a shower of BBs down range. The biggest point of surprise from me was that the AK side-rail mount actually tightens down quite securely. I wasn’t confident that the polymer body would be able to mount it with durability, but it seems to hold rather well.
If you’re planning to use a Double Bell AK for a custom build in the future, I’m pleased to let you know that their furniture has similar specifications to LCT. Since LCT is one of the most popular brands on the market for AK enthusiasts, this opens Double Bell’s windows for customization by quite a bit. I still recommend a LCT AK much more if you have the coin, but this is a decently viable option if you want to set up a rifle while pinching some pennies. Note: Much like the polymer PDW, the rifle does not have threads unless you opt for the pricier full metal model.
Airsoft doesn’t need to be expensive! By picking out the items that best suit your needs at the best value, you can save a good amount of cash. Reading articles like these better inform you to what’s important as well! If you’re curious about Double Bell as a brand, I highly recommend checking out my earlier article where I deep dive into their internal systems and explore what makes them great (click here!) Good luck on your custom build adventures, dear reader! Post anything cool you made inspired by this article on instagram and make sure to tag us @airsoftevike!